Shopify

Take Armenian payments on Shopify.

Your buyer finishes Shopify's own checkout, then pays by card, Idram or Telcell on Paynet. The order is marked paid in Shopify the moment the payment goes through.

About 10 minutes No code Free to install
How it works

Shopify checkout stays exactly as it is

Nothing about the way your store takes orders changes. Paynet is added after the order is placed.

1

The buyer checks out

At checkout they pick your payment method, for example "Card payment", and place the order as usual. Shopify records it as unpaid.

2

They press Pay by card

A Pay by card button waits for them on the thank you page, on their order page and in the confirmation email, so closing a tab never loses the payment.

3

The order turns Paid

Paynet charges the exact amount Shopify says is outstanding, marks the order Paid, tags it and, if you want, fulfils it.

Before you start

  • A Paynet account that can take payments, with at least one payment method switched on.
  • Your store currency set to Armenian dram (AMD).
  • Your store address, the one that ends in .myshopify.com. You will find it in Shopify under Settings, Domains.
  • Permission to change settings in your Shopify admin (store owner or staff with Settings access).

The fast way: let the dashboard walk you through it

Your Paynet dashboard lists these same steps with an Open in Shopify button beside each one, taking you straight to the right screen in your store. Each step ticks off as you go.

Open my Shopify setup
Setup

Eight short steps, in this order

Steps marked Paynet are ours: you only wait for our email. The rest take a minute or two each, and the screenshots show exactly what you will see.

  1. 1 Add your payment method in Shopify
  2. 2 Ask for your store app in Paynet
  3. 3 We prepare your app
  4. 4 Press Install
  5. 5 Put the Pay by card button on the Thank you page
  6. 6 Put the same button on the Order status page
  7. 7 Add the button to the confirmation email
  8. 8 Check it with one order
1

Add your payment method in Shopify

You · 2 min

Go to Settings, then Payments. Scroll to Manual payment methods and open it.
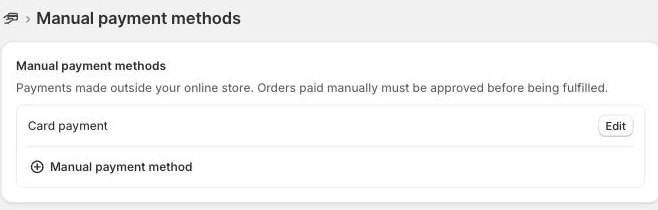
Settings, Payments, Manual payment methods

Press Manual payment method, then Create custom payment method.
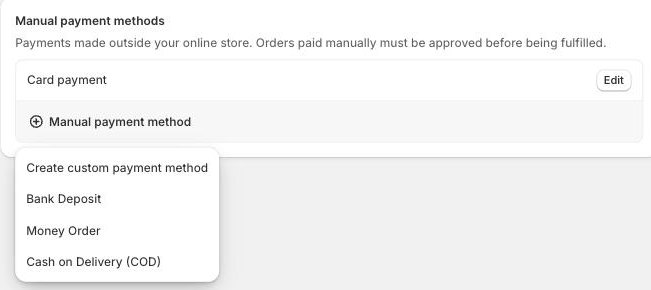
Create custom payment method

Name it what buyers should see, for example "Card payment", and leave Additional details empty. In Payment instructions write, for example, "Press Pay by card to pay now": buyers see it right after placing the order. Then press Activate. You can do this before anything else.
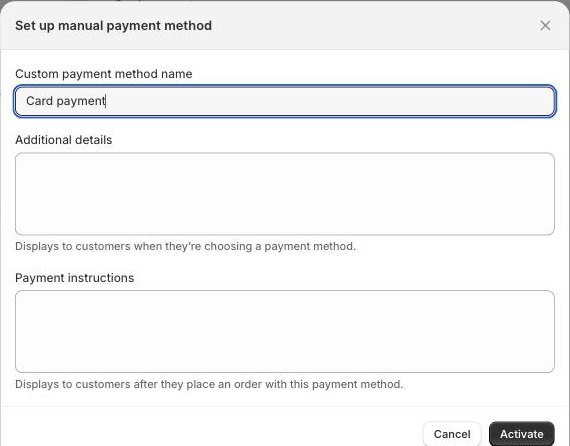
The name here is what buyers see at checkout
2

Ask for your store app in Paynet

You · 1 min

In your Paynet dashboard open Shopify, type your .myshopify.com address and press Request. That is the whole form. Nothing to download and nothing to pay.

3

We prepare your app

Paynet · A few minutes

Shopify allows this kind of app on one named store, so each store gets its own. Ours are built in advance, so we only have to name your store on one. You get an email the moment it is ready, and your dashboard page updates on its own.

4

Press Install

You · 1 min

Press Install on your dashboard or in the email. Shopify shows what the app may read and change: your orders, so it can see what is unpaid and mark it paid. Approve it and your store is connected.

Paynet never reads your customers' names, emails or addresses from Shopify. It reads only the order total, what is still owed and the confirmation number.

5

Put the Pay by card button on the Thank you page

You · 1 min

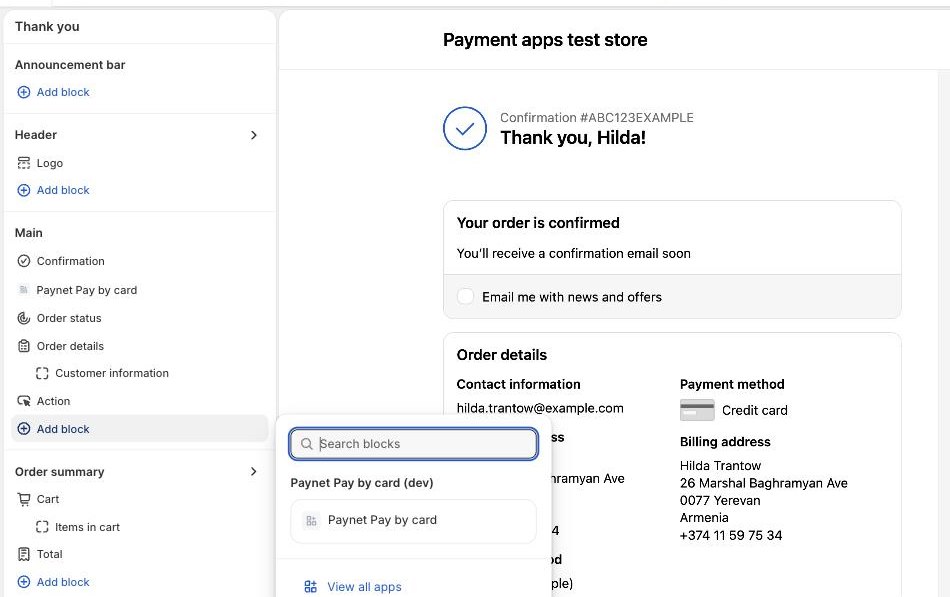
Go to Settings, then Checkout, and press Customize. With the Thank you page selected, press Add block under Main and choose Paynet Pay by card. Drag it to the top if you like, then Save.

Add block, then Paynet Pay by card
6

Put the same button on the Order status page

You · 1 min

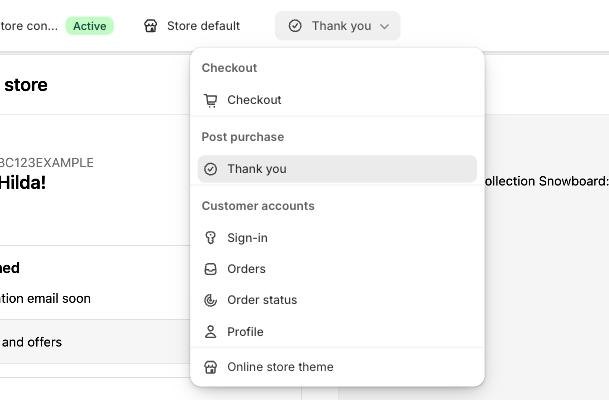
Still in the editor, open the page menu at the top and choose Order status, under Customer accounts.

The page menu: Order status sits under Customer accounts

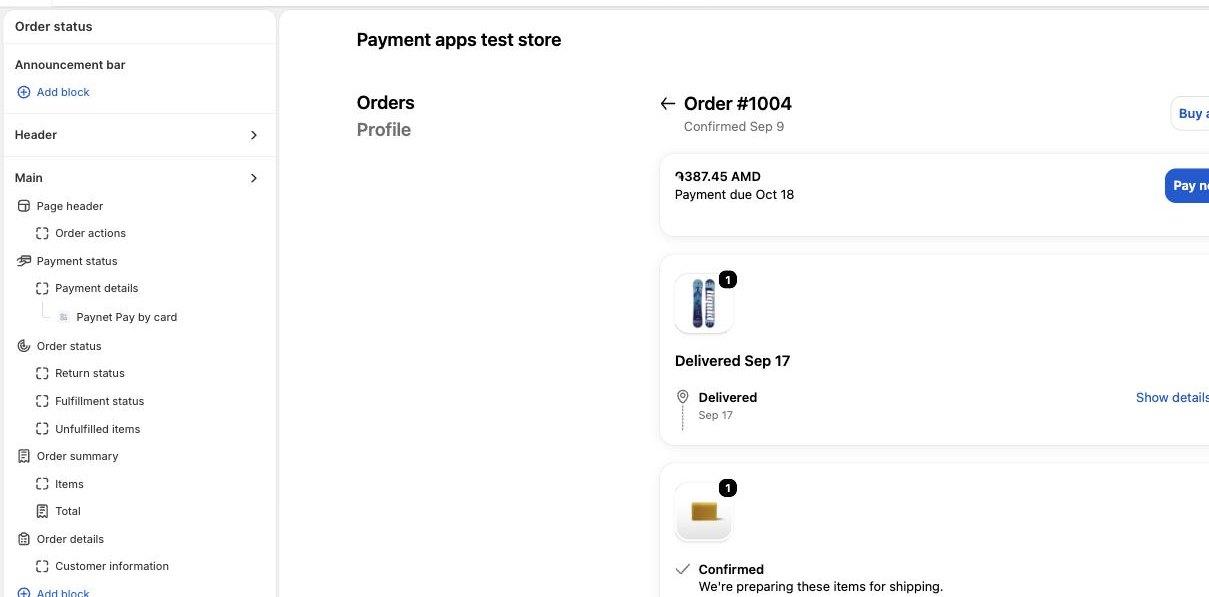
Press Add block, choose Paynet Pay by card again, and Save. It appears under the payment details.

The block in place, with the amount still owed

Do not skip this one. A buyer who refreshes the Thank you page, or comes back later from their email, lands on the Order status page, and without the block there they have no way back to the payment.

7

Add the button to the confirmation email

You · 2 min

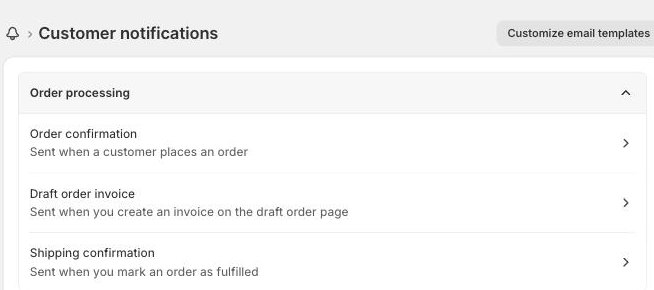
Go to Settings, Notifications, Customer notifications, then Order confirmation. Press Edit code, paste the snippet below at the very end, and Save. The same snippet works in the Order invoice email, which is what "Send invoice" uses.

Settings, Notifications, Customer notifications

The email snippet

Copy this into the Order confirmation email. It shows the button only while the order is still unpaid, in the buyer's own language.

{%- comment -%}
  Paynet: Pay by card button for the Shopify order confirmation email.

  Where: Settings, Notifications, Customer notifications, Order confirmation,
  Edit code. Paste this anywhere below the order summary, then Save. Send a test
  notification from the same screen to see it.

  It shows only while the order is really unpaid, so a buyer who has already paid
  never sees it, and it leaves the email on its own once the order is paid. The
  store domain comes from Shopify, so the snippet is identical for every store:
  nothing in it needs editing.

  The two conditions are nested on purpose. Liquid has no parentheses and reads
  and/or right to left, so writing them on one line would be a trap for whoever
  edits this next.

  The text follows the buyer's own language. Shopify ships its default templates
  in many languages and sends each buyer their own, but the moment a template is
  customised it becomes monolingual, so the language has to be chosen here or an
  Armenian shop would email Armenian buyers in English.
{%- endcomment -%}
{%- unless order.cancelled -%}
  {%- if order.financial_status == 'pending' or order.financial_status == 'partially_paid' -%}
    {%- assign paynet_url = 'https://paynet.am/integrations/shopify/pay?shop=' | append: shop.permanent_domain | append: '&order=' | append: order.id | append: '&c=' | append: order.confirmation_number -%}
    {%- assign paynet_lang = order.customer_locale | default: 'en' | slice: 0, 2 -%}
    {%- assign paynet_text = 'Your order is not paid yet. Pay by card on the secure Paynet page to complete it.' -%}
    {%- assign paynet_label = 'Pay by card' -%}
    {%- if paynet_lang == 'hy' -%}
      {%- assign paynet_text = 'Ձեր պատվերը դեռ վճարված չէ։ Վճարեք քարտով Paynet-ի պաշտպանված էջում՝ այն ավարտելու համար։' -%}
      {%- assign paynet_label = 'Վճարել քարտով' -%}
    {%- elsif paynet_lang == 'ru' -%}
      {%- assign paynet_text = 'Ваш заказ ещё не оплачен. Оплатите картой на защищённой странице Paynet, чтобы завершить его.' -%}
      {%- assign paynet_label = 'Оплатить картой' -%}
    {%- endif -%}
    <table class="row" style="width:100%;border-collapse:collapse;margin:24px 0;">
      <tr>
        <td style="padding:20px;border:1px solid #e5e7eb;border-radius:8px;font-family:Helvetica,Arial,sans-serif;">
          <p style="margin:0 0 16px;font-size:16px;line-height:24px;color:#111827;">
            {{ paynet_text }}
          </p>
          <a href="{{ paynet_url }}" style="display:inline-block;padding:12px 24px;background-color:#2563eb;color:#ffffff;font-size:16px;font-weight:bold;text-decoration:none;border-radius:6px;">
            {{ paynet_label }}
          </a>
        </td>
      </tr>
    </table>
  {%- endif -%}
{%- endunless -%}
8

Check it with one order

You · 2 min

Buy something cheap from your own store with your new payment method and press Pay by card. The Paynet page shows the same total Shopify showed you, and within seconds of paying the order turns Paid and is tagged "Paynet paid". Refund it from your Paynet dashboard to get the money back.

What happens after a payment

All of it automatic, with nothing for you to press.

Paid The order is marked Paid for the exact amount charged and tagged "Paynet paid".
Not completed A failed or abandoned attempt tags the order "Paynet payment not completed". A later successful payment removes the tag.
Fulfilment If you ask us to, paid orders are fulfilled automatically, either all of them or only those with nothing to ship.
Refunds Refund in your Paynet dashboard and it appears on the Shopify order against the original payment, tagged "Paynet refunded". Refunding inside Shopify does not move money at the bank.
Receipts If you use an e-HDM device, the fiscal receipt is issued for the same amount at the same moment.

Worth knowing

The buyer pays after placing the order

Shopify only opens its checkout to approved payment partners, so the payment step comes straight after the order instead of inside checkout. That is why the button sits in three places at once, and why an order stays unpaid until the buyer pays.

Amounts can carry luma

A total such as ֏629.95 is charged exactly as it stands. Nothing is rounded, so what Shopify shows and what the buyer pays always match.

One app per store

Shopify allows this kind of app on one named store at a time. Running several stores? Each needs its own website in Paynet, then request each store the same way.

The price cannot be tampered with

The payment link carries no amount. Paynet asks Shopify what is still owed at the moment of payment, so an edited link cannot underpay an order.

Ready to connect your store?

Type your .myshopify.com address in your dashboard. Your app is usually ready within minutes.